Settings Guide
Configure OrderFlow for your store.
1. Overview
All OrderFlow settings live in your Shopify admin under the Settings tab. The page is organized into four tabs: General (order page, buyer eligibility, store integration, product sync), Email (notifications, templates, reorder reminders), Order Page (new buyer welcome, category tiles, ordering rules, B2B settings, MOQ), and Advanced (integrations, danger zone).
Each section has its own Save button, so you can update one area without affecting others. Changes take effect immediately after saving — there is no deploy step or waiting period. The quick order page on your storefront reflects the new settings the next time a customer loads it.
The settings page uses Shopify Polaris components throughout, so the interface feels native to your Shopify admin experience. Form fields include inline validation and helpful descriptions to guide you through each option without needing to reference documentation.
If you are setting up OrderFlow for the first time, we recommend working through the sections from top to bottom. Start with Order Page Settings and Buyer Eligibility to get the basics configured, then move on to email and integrations when you are ready to expand the functionality.

2. Order Page Settings
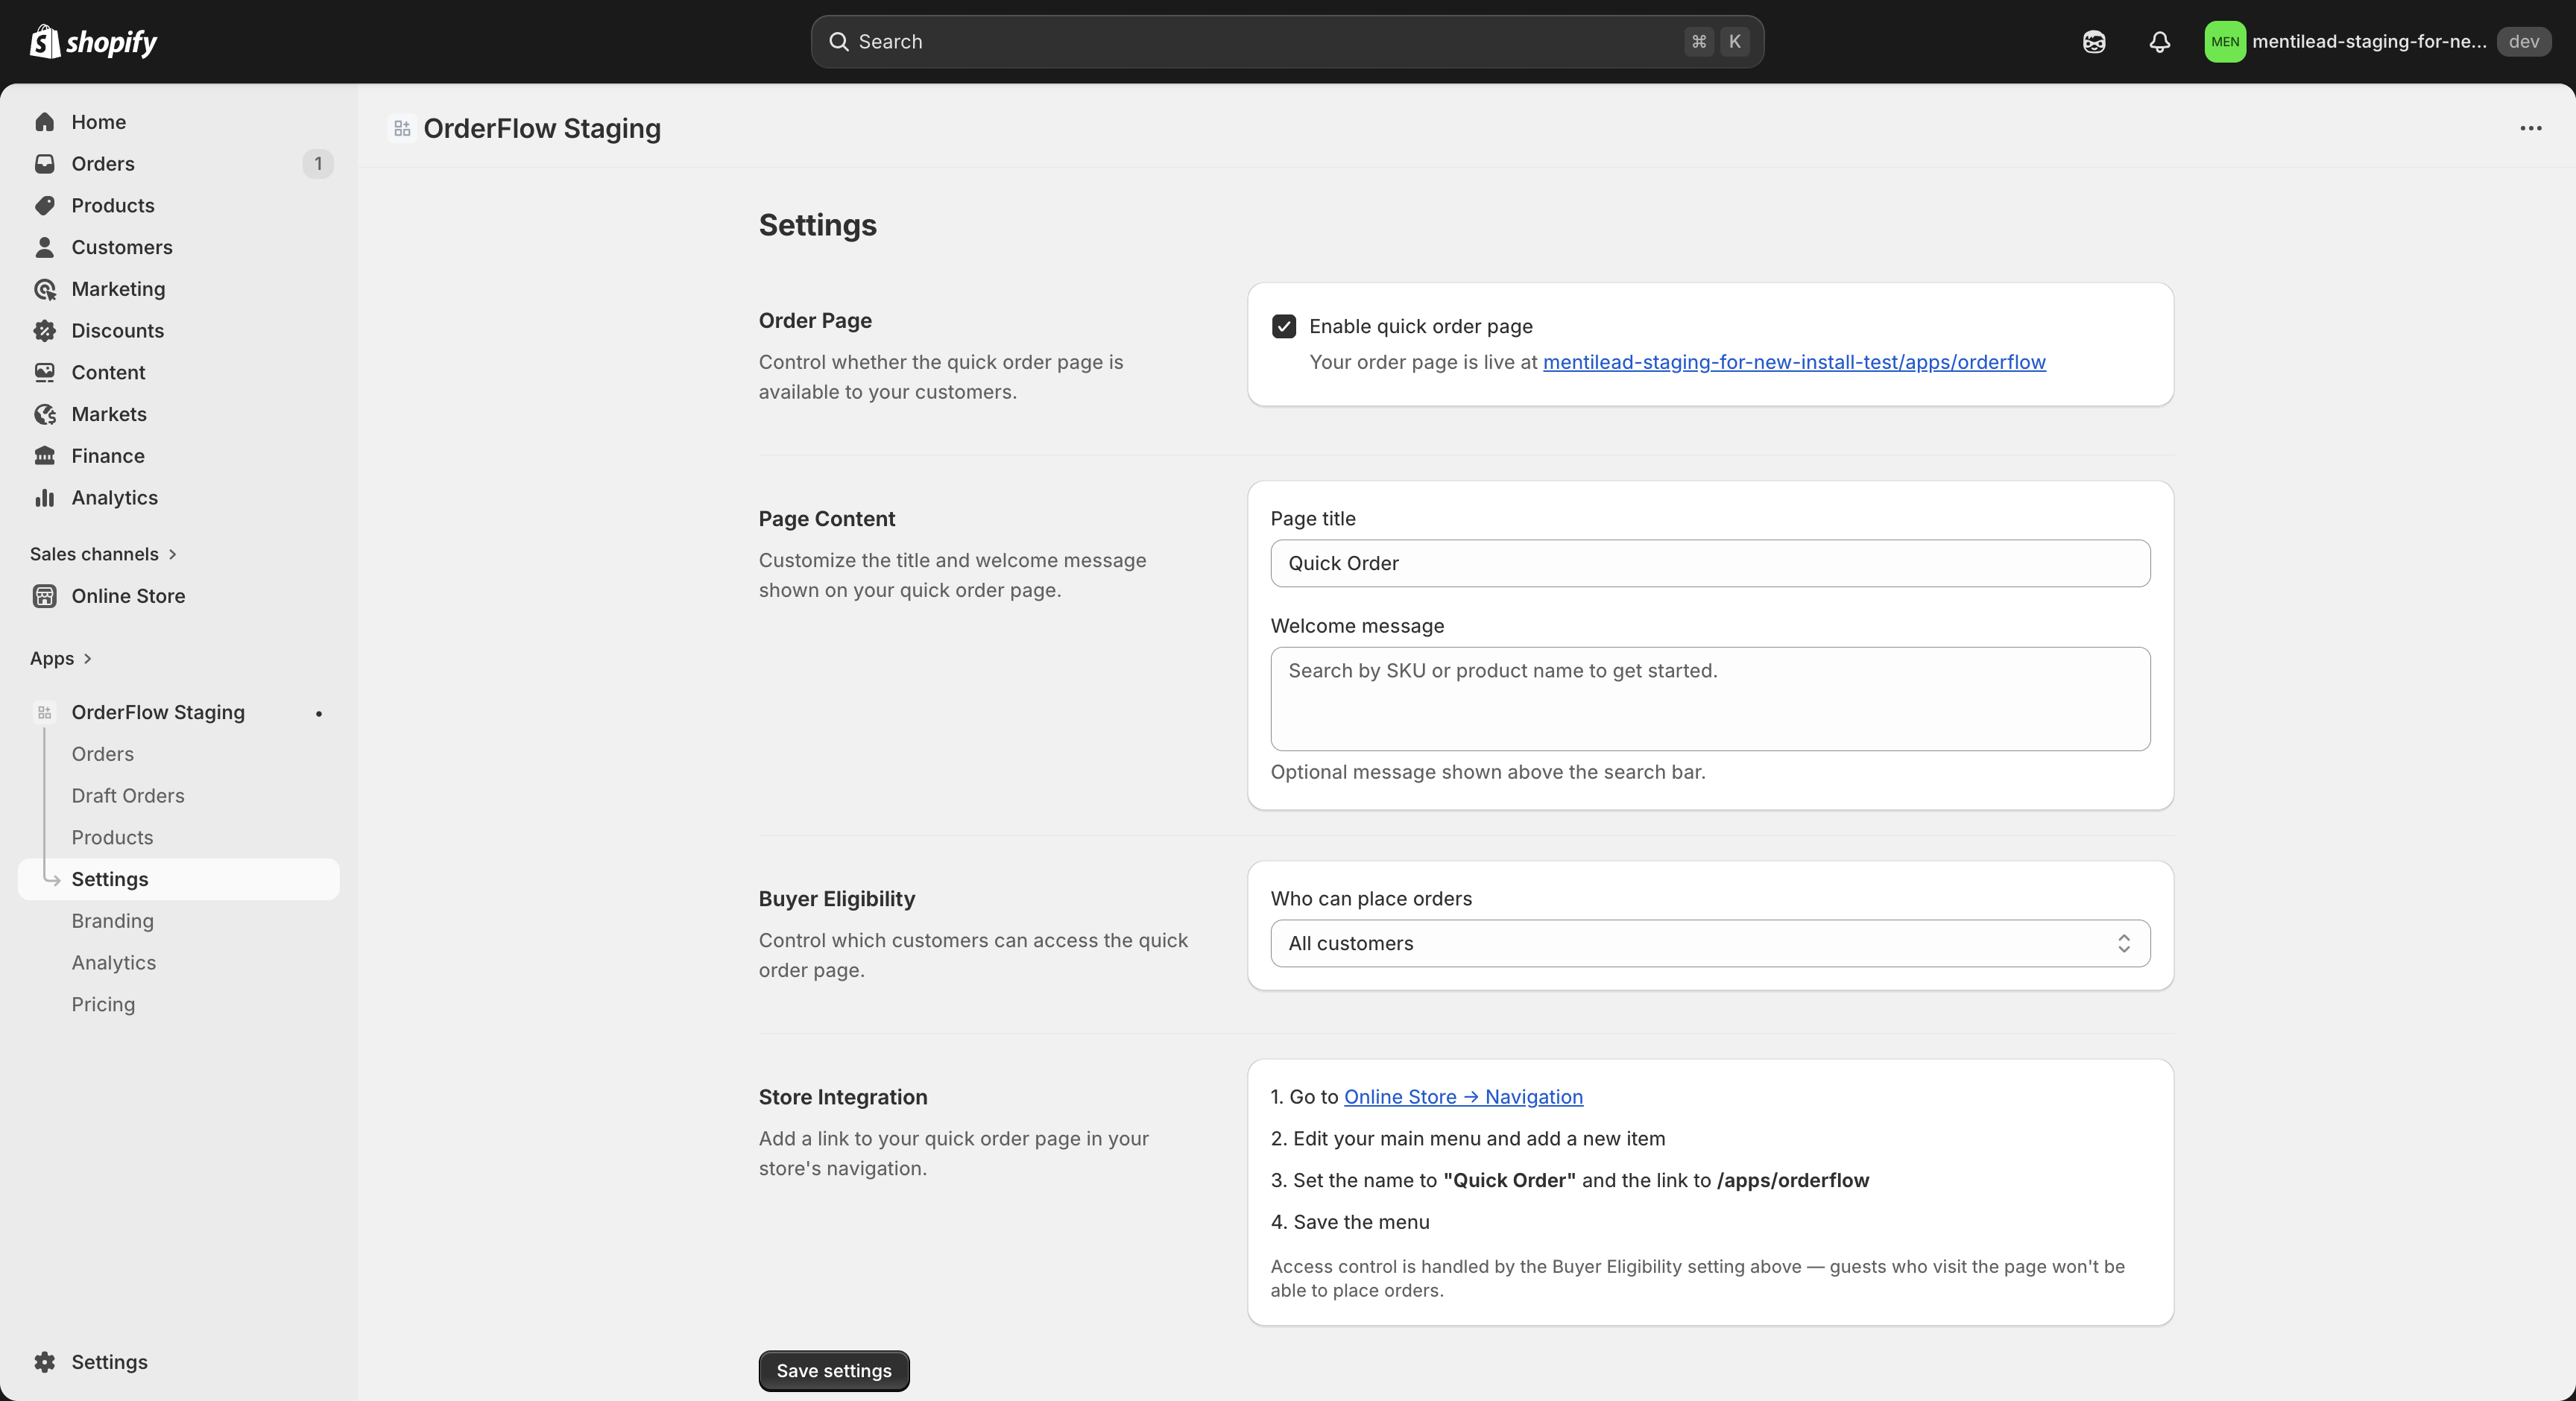
The Order Page section controls the core behavior and content of your quick order page. These settings determine whether the page is accessible and what customers see when they visit.
Enable/Disable toggle
Turns the quick order page on or off globally. When disabled, customers who visit the proxy URL see a "Page disabled" message instead of the ordering interface. This is useful for maintenance windows, seasonal closures, or when you want to pause B2B ordering temporarily without removing the navigation link from your store.
Page title
The heading displayed at the top of the quick order page. The default is "Quick Order", but you can change it to anything that fits your brand — "Wholesale Order Form", "B2B Portal", "Trade Order Page", or any custom text. Keep it concise and descriptive.
Welcome message
Optional text displayed below the page title and above the search bar. Use this for instructions, announcements, or helpful context. For example: "Search by SKU or product name to get started", "Minimum order: $200", or "New items added weekly — check the Products tab." Leave blank to show no message.
These three settings give you basic control over the page's availability and messaging. For visual customization (colors, fonts, layout), use the Branding page instead.
3. Buyer Eligibility
Buyer Eligibility controls who can access the quick order page. This is one of the most important settings for B2B stores that want to restrict the ordering interface to specific customer segments rather than making it available to all visitors.
Three access modes are available:
All customers
Any logged-in Shopify customer can use the quick order page. This is the default setting and works well for stores where all customers benefit from quick ordering — for example, if your entire customer base is wholesale buyers, or if you want to offer the convenience to everyone.
Tagged customers
Only customers with specific tags can access the page. Enter one or more tags (e.g., "wholesale", "b2b", "trade") and only customers who have at least one of those tags on their Shopify customer profile will be allowed in. Customers without the required tags see a "Not eligible" message. This is ideal for stores that serve both retail and wholesale customers and want to keep the quick order page exclusive to approved buyers.
B2B only
Only Shopify B2B company members can access the page. This uses Shopify's native B2B system to verify that the logged-in customer belongs to a company. Non-B2B customers see a "Not eligible" message. This option is only relevant for stores that have B2B companies configured in Shopify.
Regardless of which mode you choose, customers must be logged in to use the quick order page. Anonymous visitors are always redirected to the store's login page first. After logging in, they are returned to the quick order page automatically.
4. B2B Settings
The B2B Settings section is visible on Standard and Plus plans. On Standard, it shows the B2B detection status — whether market-based B2B is detected via Shopify Markets and catalog price lists, or no B2B is configured. B2B features require a paid plan.
On the Plus plan, the section additionally shows approval threshold controls. When enabled, B2B company buyers placing orders above the threshold create a draft order for your review instead of completing checkout immediately. You approve or reject the draft order from the Orders page in the OrderFlow admin.
Require approval for B2B orders above a threshold
A checkbox that turns the approval workflow on or off. When enabled, any B2B company buyer placing an order above the threshold will have the order held as a draft for your review instead of proceeding to checkout.
Approval threshold
The amount (in your store's currency) above which orders require approval. This is the store-wide default — every B2B company on your store uses this value unless you set a per-company override (see below). Set it to 0 to require approval for every B2B order regardless of size.
Per-company overrides
To set a different threshold for a specific company, edit the Approval Threshold metafield on the company page in Shopify admin (Customers > Companies > [Company name]). OrderFlow creates this metafield definition automatically when B2B is detected on your store. Per-company values take precedence over the store-wide default for orders placed by members of that company.
When no B2B companies are detected on your store yet, an info banner appears explaining that the setting will take effect once you set up B2B companies in Shopify. The feature remains visible so you can pre-configure the threshold before onboarding your first company.
Draft orders created by the approval workflow appear on the Orders page under a "Draft orders" tab (only visible when B2B is active on your store). Each draft shows the buyer's name, company, line items, and total. You can approve it (which converts it to a real order that the buyer can check out) or reject it with a note explaining why. Draft order actions are audit-logged with the actor, timestamp, and outcome.
5. Store Integration
The Store Integration section provides your unique proxy URL and step-by-step instructions for adding the quick order link to your store's navigation. This is the URL customers use to access the ordering page.
Your proxy URL looks like your-store.myshopify.com/apps/orderflow and is generated automatically when you install the app. A copy button next to the URL makes it easy to grab the full address without manual selection.
Below the URL, step-by-step instructions walk you through adding the link to your store navigation:
- Go to Online Store > Navigation in your Shopify admin.
- Select your main menu (or any menu where you want the link to appear).
- Click "Add menu item".
- Set the title (e.g., "Quick Order") and paste the proxy URL.
- Click Save.
The proxy URL works with any Shopify theme. Because it runs through Shopify's App Proxy, the page inherits your theme's header, footer, and fonts automatically. You can add the link to your main menu, footer menu, or any custom navigation structure your theme supports.
6. Email Settings
Email Settings configure the addresses and sender information used for all OrderFlow email notifications. These settings apply to every email template — order confirmations, merchant notifications, issue alerts, and reorder reminders.
Merchant notification email
The email address where you receive alerts about new orders placed through OrderFlow. This can be your personal email, a shared inbox like orders@yourstore.com, or any address you monitor regularly. You will receive a notification every time a customer completes checkout through the quick order page.
Reply-to address
When customers receive an order confirmation email and hit Reply, their message goes to this address. Set it to an address you monitor for customer inquiries — such as support@yourstore.com or your personal email. This ensures customer replies reach the right person.
From name
The display name shown in the "From" field of outgoing emails. Use your store name or brand name so customers recognize the sender immediately. For example: "Acme Supply Co.", "Your Store Name", or "OrderFlow Orders". Keep it professional and recognizable.
All OrderFlow emails are sent through Resend, a transactional email service. Deliverability is handled automatically — you do not need to configure DNS records or SMTP settings. Emails are sent from an OrderFlow domain with proper SPF and DKIM authentication.
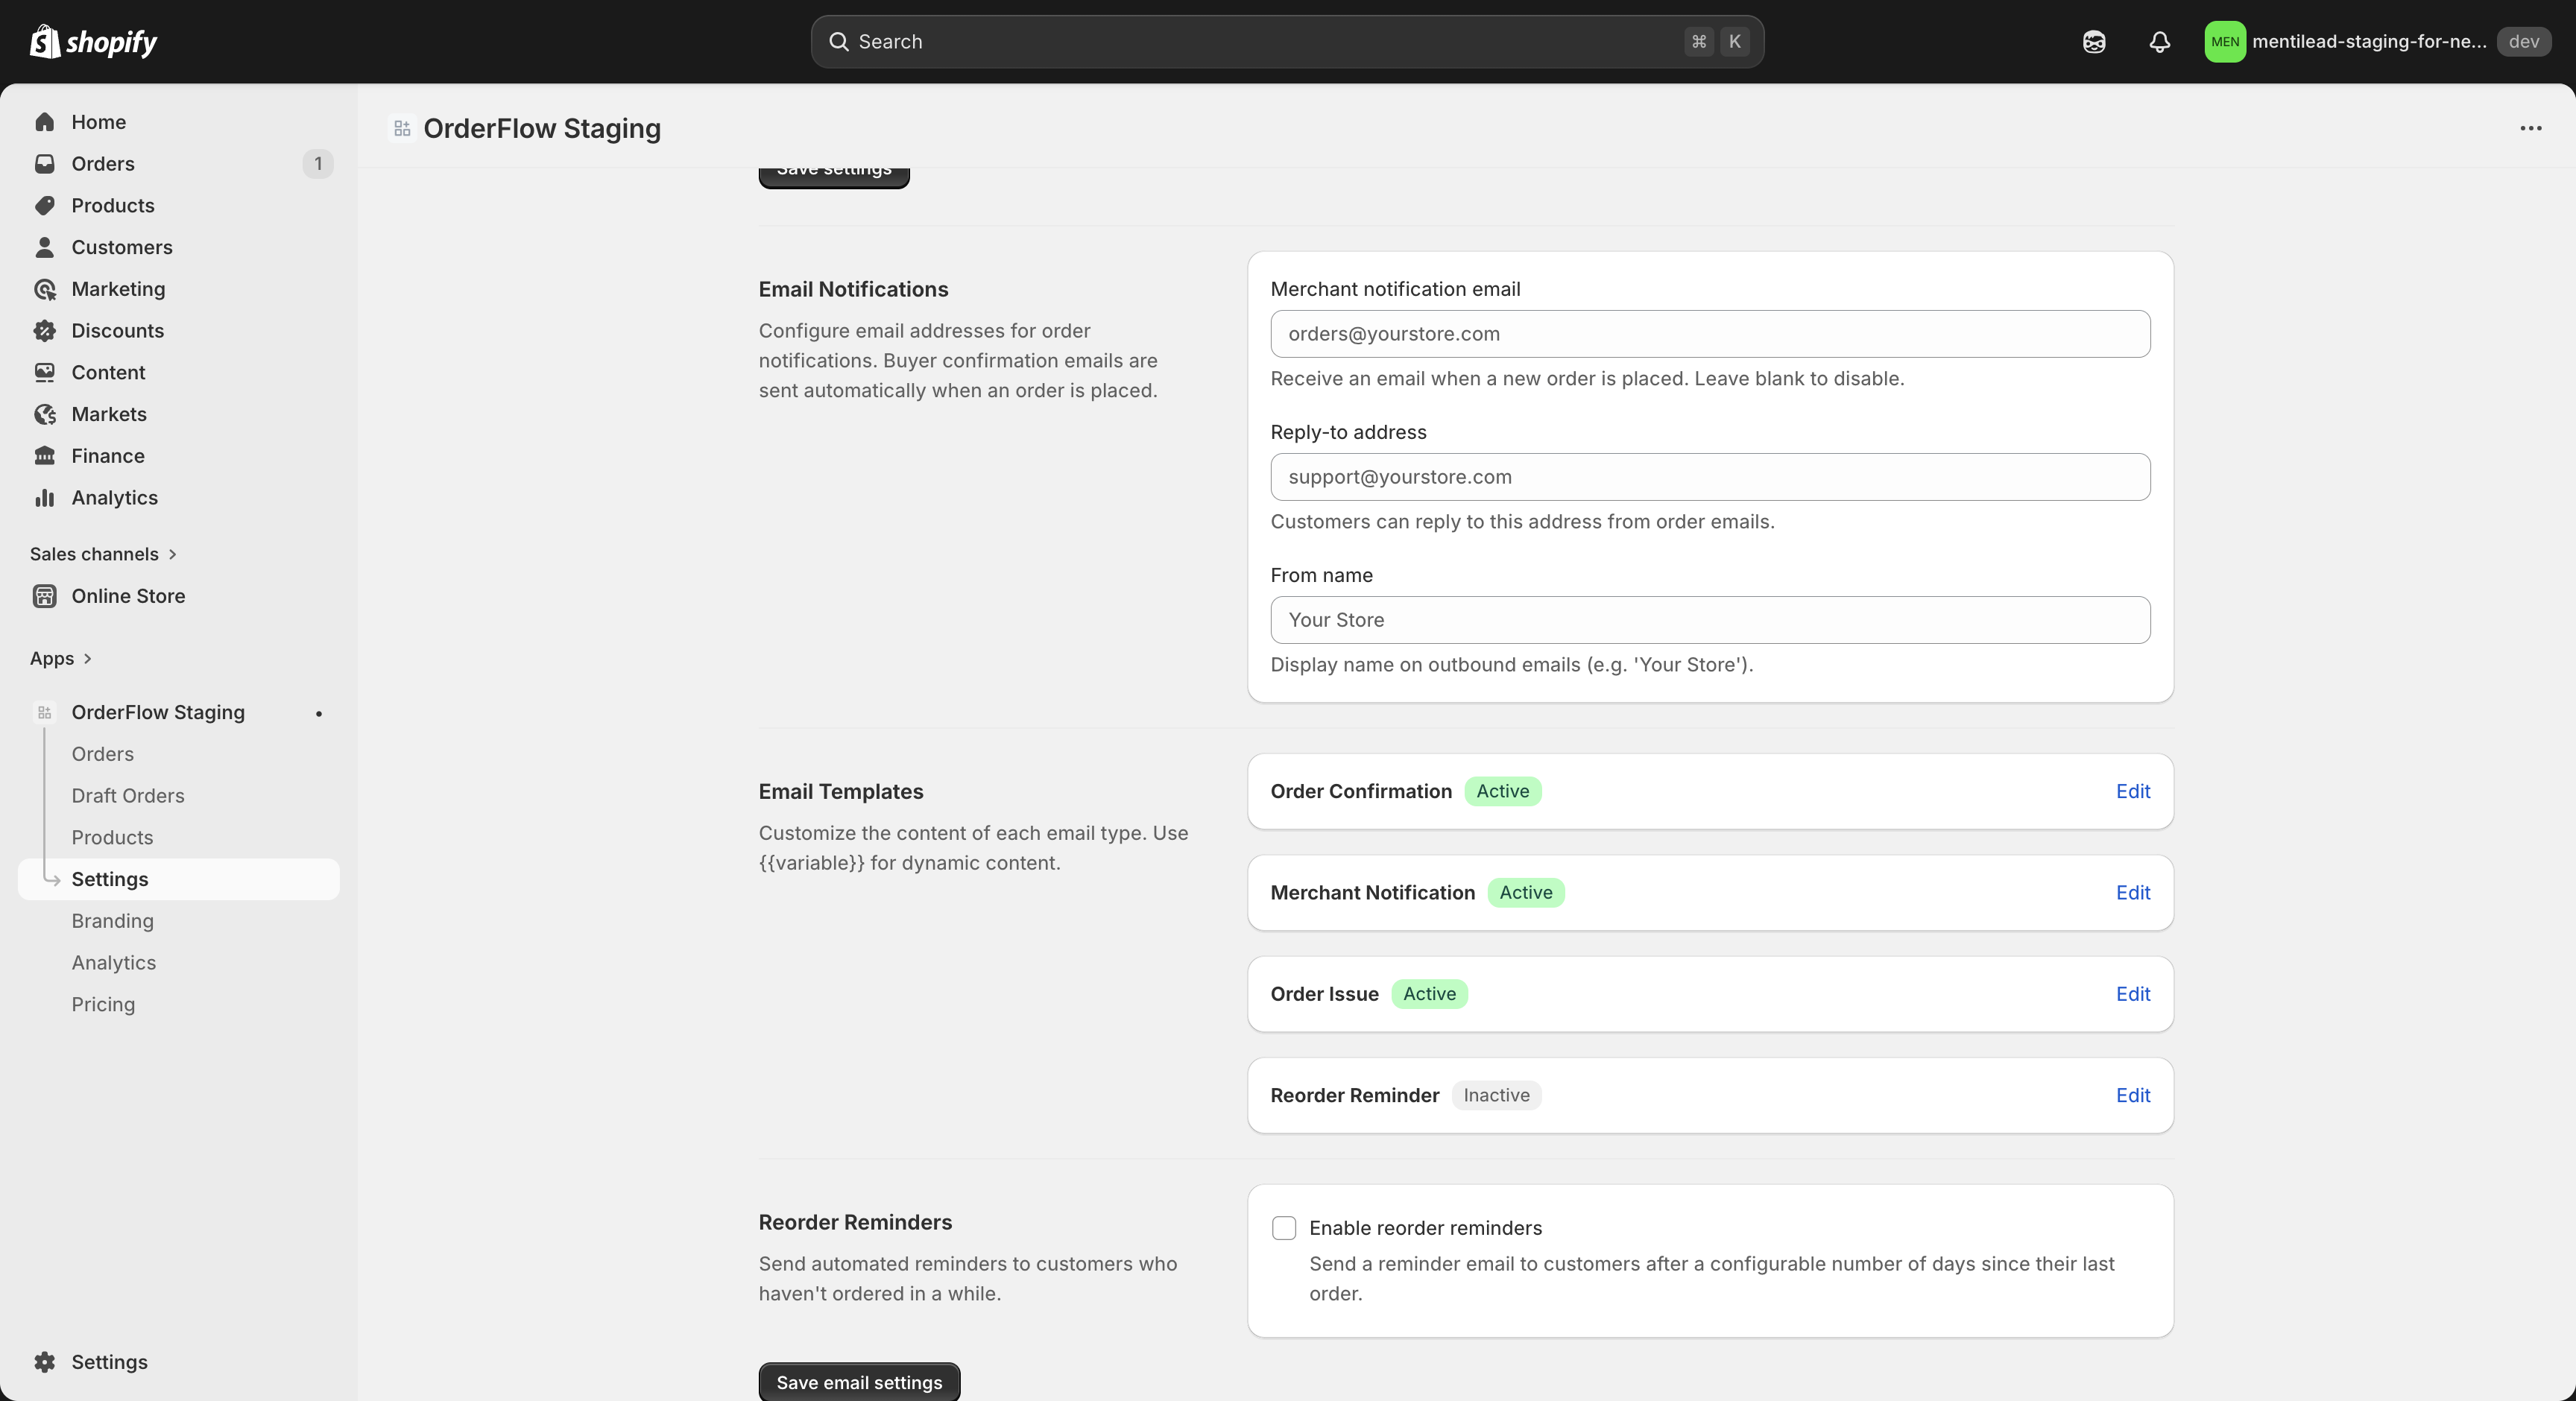
7. Email Templates
OrderFlow includes four customizable email templates that cover the key communication touchpoints in the ordering workflow. Each template can be enabled or disabled independently, and the subject line and body text are fully editable.
Order Confirmation
Sent to the buyer immediately after they complete checkout. Includes the order number, line items, quantities, and total. This provides buyers with a written record of their order and reassurance that it was received successfully.
Merchant Notification
Sent to you (the merchant) whenever a new order arrives through OrderFlow. Includes customer name, order details, and a link to the order in your Shopify admin. This keeps you informed in real time without needing to check the dashboard.
Order Issue
Sent to the buyer if there is a problem with their order — for example, if items become unavailable after checkout or if there is a processing error. Use this template to communicate issues proactively and maintain customer trust.
Reorder Reminder
Sent to buyers who have not placed an order within the configured reminder interval. Encourages them to come back and reorder. This template is only active when Reorder Reminders are enabled (see the next section).
Each template supports the following variables that are replaced with real values when the email is sent:
| Variable | Replaced with |
|---|---|
{{orderName}} |
The Shopify order number (e.g., #1042) |
{{customerName}} |
The buyer's full name |
{{shopName}} |
Your store's name |
{{totalPrice}} |
The order total with currency symbol |
Each template has a "Send test" button that sends a preview email to your merchant notification address. Use this to verify the template looks correct before enabling it for customers. Test emails use placeholder values for the template variables so you can see the full layout.
8. Reorder Reminders
Reorder Reminders automatically email customers who have not placed an order through OrderFlow within a configurable time period. This is a lightweight way to re-engage inactive buyers and encourage repeat ordering without manual outreach.
The section has two controls: an enable toggle and a reminder interval in days. The interval can be set anywhere from 7 to 365 days, with a default of 30 days. For example, if you set the interval to 14 days, a customer who last ordered 15 days ago will receive the Reorder Reminder email template.
When enabled, OrderFlow checks daily for customers who have exceeded the inactive period. Only customers who have previously placed at least one order through OrderFlow receive reminders — new customers who have never ordered are not included. Each customer receives at most one reminder per inactive period to avoid email fatigue.
The content of the reminder email is controlled by the Reorder Reminder template in the Email Templates section above. Customize the subject line and body to match your brand voice. Common approaches include a friendly check-in ("Time to restock?"), a promotional angle ("New items since your last order"), or a direct prompt ("Your usual order is one click away").
9. Order Page
The Order Page tab controls what buyers see when they land on your quick order page. These settings let you customize the experience for both first-time and returning buyers.
New Buyer Welcome
Set a welcome message that appears for buyers who haven't placed an order yet. This helps first-time visitors understand what the page offers and how to get started. Leave it empty to show the default search prompt.
You can also specify featured product IDs (comma-separated Shopify variant IDs) to highlight specific products for new buyers instead of the automatic popular products.
Category Tiles
Add browseable category tiles that appear on the order page for first-time buyers. Each tile has a label, an optional image URL, and a search query that runs when the buyer clicks it. For example, a tile labelled "Safety Equipment" with search query "safety" would show all products matching "safety" when clicked.
Click "Add category tile" to create a new tile, and "Remove tile" to delete one. Tiles appear in the order you create them.
Order Minimum
Set a minimum order value in your store's currency. When configured, a progress bar appears in the cart sidebar showing how close the buyer is to meeting the minimum. This is a visual indicator only — it does not block checkout. Set to 0 or leave empty to disable.
Matrix Ordering View
Enable this to show a 2D grid view for products with multiple variant options (e.g. Size and Color). Buyers can enter quantities for each variant combination in a single grid, then add all selections to the cart at once. This is particularly useful for apparel, hardware, or any product with a size/color matrix. A grid icon button appears next to multi-variant products in search results when enabled.
Minimum Order Quantities
Set minimum order quantities (MOQ) to control how many units a buyer must add per product. Start with a global default that applies to all products — for example, a minimum of 1 and a step increment of 1. The global default is available on Standard and Plus plans.
On the Plus plan, you can add per-collection overrides by selecting a collection from the dropdown. Each collection override specifies its own minimum quantity and step increment. You can also add per-product overrides by entering a Shopify product ID — these are available on both Standard and Plus plans. Per-product rules take the highest precedence, followed by per-collection rules, then the global default.
On the storefront, buyers see MOQ badges on affected products (e.g. "Min: 5 · Step: 5"), quantity steppers enforce the minimum and step values, and inline errors prevent invalid quantities from being added to the cart. CSV imports and saved list loads also validate against MOQ rules automatically.
Price display rules
This is a display feature. Checkout tax is calculated by Shopify — OrderFlow never modifies it. Price display rules only change how prices render on the Quick Order page. They let you show prices inclusive of VAT/GST, exclusive of VAT/GST, or both side-by-side to different customer segments on the same storefront.
First, set the Prices in my Shopify store include tax checkbox to match your Shopify store setting (Settings → Taxes and duties → All prices include tax). OrderFlow uses this to compute the alternate amount when a rule asks for the opposite display mode.
Each rule has five fields:
- Customer tag — the Shopify customer tag to match against (e.g.
trade). Use*as the tag to apply the rule to all non-B2B buyers as a fallback. - Display mode — inclusive (single price with an inc. VAT label), exclusive (single price with an ex. VAT label plus a "VAT will be added at checkout" banner above search), or dual (both amounts rendered side-by-side, separated by " / ").
- Rate percent — the VAT/GST rate used to compute the alternate amount in dual mode (or to flip an inclusive price to exclusive, or vice versa). Must be between 0 and 100.
- Label (inclusive) and Label (exclusive) — the text shown alongside each amount. Defaults to "inc. VAT" and "ex. VAT" when left empty.
Example: { customerTag: "trade", displayMode: "exclusive", ratePercent: 20, labelExc: "ex. VAT" } renders prices like £100.00 ex. VAT with the "VAT will be added at checkout" banner for buyers tagged "trade". Rules are evaluated in array order and the first tag match wins; the * wildcard is used as a fallback if no tag matches.
Rules are ignored for Shopify B2B Company members — when the buyer resolves into a Shopify B2B company context (advanced tier) or market context (basic tier), OrderFlow renders the native B2B pricing exactly as it does today. This ensures Shopify's own B2B flow always takes precedence over merchant-configured display rules.
10. Integrations
The Integrations section connects OrderFlow with external services to extend its functionality. Two integrations are currently available: Google Analytics 4 and Shopify Flow.
Google Analytics 4
Enter your GA4 Measurement ID (starts with G-) to track quick order page events in your Google Analytics dashboard. OrderFlow tracks the following events: page views, product searches, add-to-cart actions, and checkout initiations.
Analytics are consent-respecting — events are only sent when the customer has accepted analytics cookies. OrderFlow uses the Measurement Protocol (server-side) rather than injecting a client-side Google Analytics JavaScript library, which means it works reliably through the App Proxy without any additional script loading.
Shopify Flow
OrderFlow provides 4 Shopify Flow triggers that fire automatically when corresponding events happen. These triggers are shown as read-only items with Active badges in the Integrations section — they require no configuration and work out of the box.
Order Placed
Fires when a customer completes checkout through OrderFlow.
Reorder Placed
Fires when a customer uses "Buy again" from their order history.
CSV Order Placed
Fires when a customer completes checkout after importing items via CSV.
Monthly Limit Reached
Fires when a store on the Free plan hits its limit of 10 orders placed through OrderFlow per month.
Use these Flow triggers to build custom automations in Shopify Flow — for example, sending a Slack notification when a large order arrives, tagging customers who place repeat orders, or alerting your team when the monthly limit is reached so they can consider upgrading. See the Flow guide for detailed automation recipes.
11. Danger Zone
The Danger Zone section at the bottom of the Settings page contains two destructive actions. Both are clearly marked with red styling and require explicit confirmation before executing. Use these with care.
Export data
Generates a downloadable file containing all of your OrderFlow data: orders, saved lists, settings, and audit logs. The export is prepared in the background and made available as a signed download link. The link remains active for 14 days, after which it expires.
Use this before making significant changes, migrating to a different solution, or as a periodic backup of your OrderFlow data. The export format is JSON, which can be processed by most data tools and spreadsheet applications.
Delete all data
Permanently removes all OrderFlow data for your shop — orders, saved lists, cart sessions, audit logs, and settings. This action is irreversible. A confirmation dialog requires you to type your store name to proceed, preventing accidental deletion.
Use this if you want immediate data deletion rather than waiting for the standard 12-month retention period after uninstalling. If you plan to uninstall OrderFlow and want your data removed right away, use this action first, then uninstall the app.
We recommend exporting your data before using the delete action. Once deleted, there is no way to recover the data — even Mentilead support cannot restore it. If you are unsure, export first, review the data, and then decide whether to proceed with deletion.