Getting Started
Set up B2B quick ordering for your Shopify store in 5 minutes.
1. Welcome to OrderFlow
OrderFlow adds a professional B2B quick order page to your Shopify store. It runs through Shopify's App Proxy at your-store.myshopify.com/apps/orderflow — no theme modifications, no code injections, no Liquid edits. Your store's theme files remain completely untouched.
Customers search by SKU or product name, upload CSV files for bulk ordering, save frequently ordered lists for one-click reordering, and check out directly through Shopify's native checkout. Everything happens on your storefront domain, matching your store's look and feel seamlessly.
OrderFlow works on any Shopify plan — from Basic to Shopify Plus. The Standard plan includes B2B market-based catalog pricing for stores using Shopify Markets with catalog price lists. Standard also includes company-specific pricing, payment terms, and draft order approvals, which requires a Shopify Plus store with B2B companies. The Plus plan adds per-collection MOQ rules and priority support. Whether you have 50 products or 50,000, OrderFlow handles your catalog with instant search and smart caching.
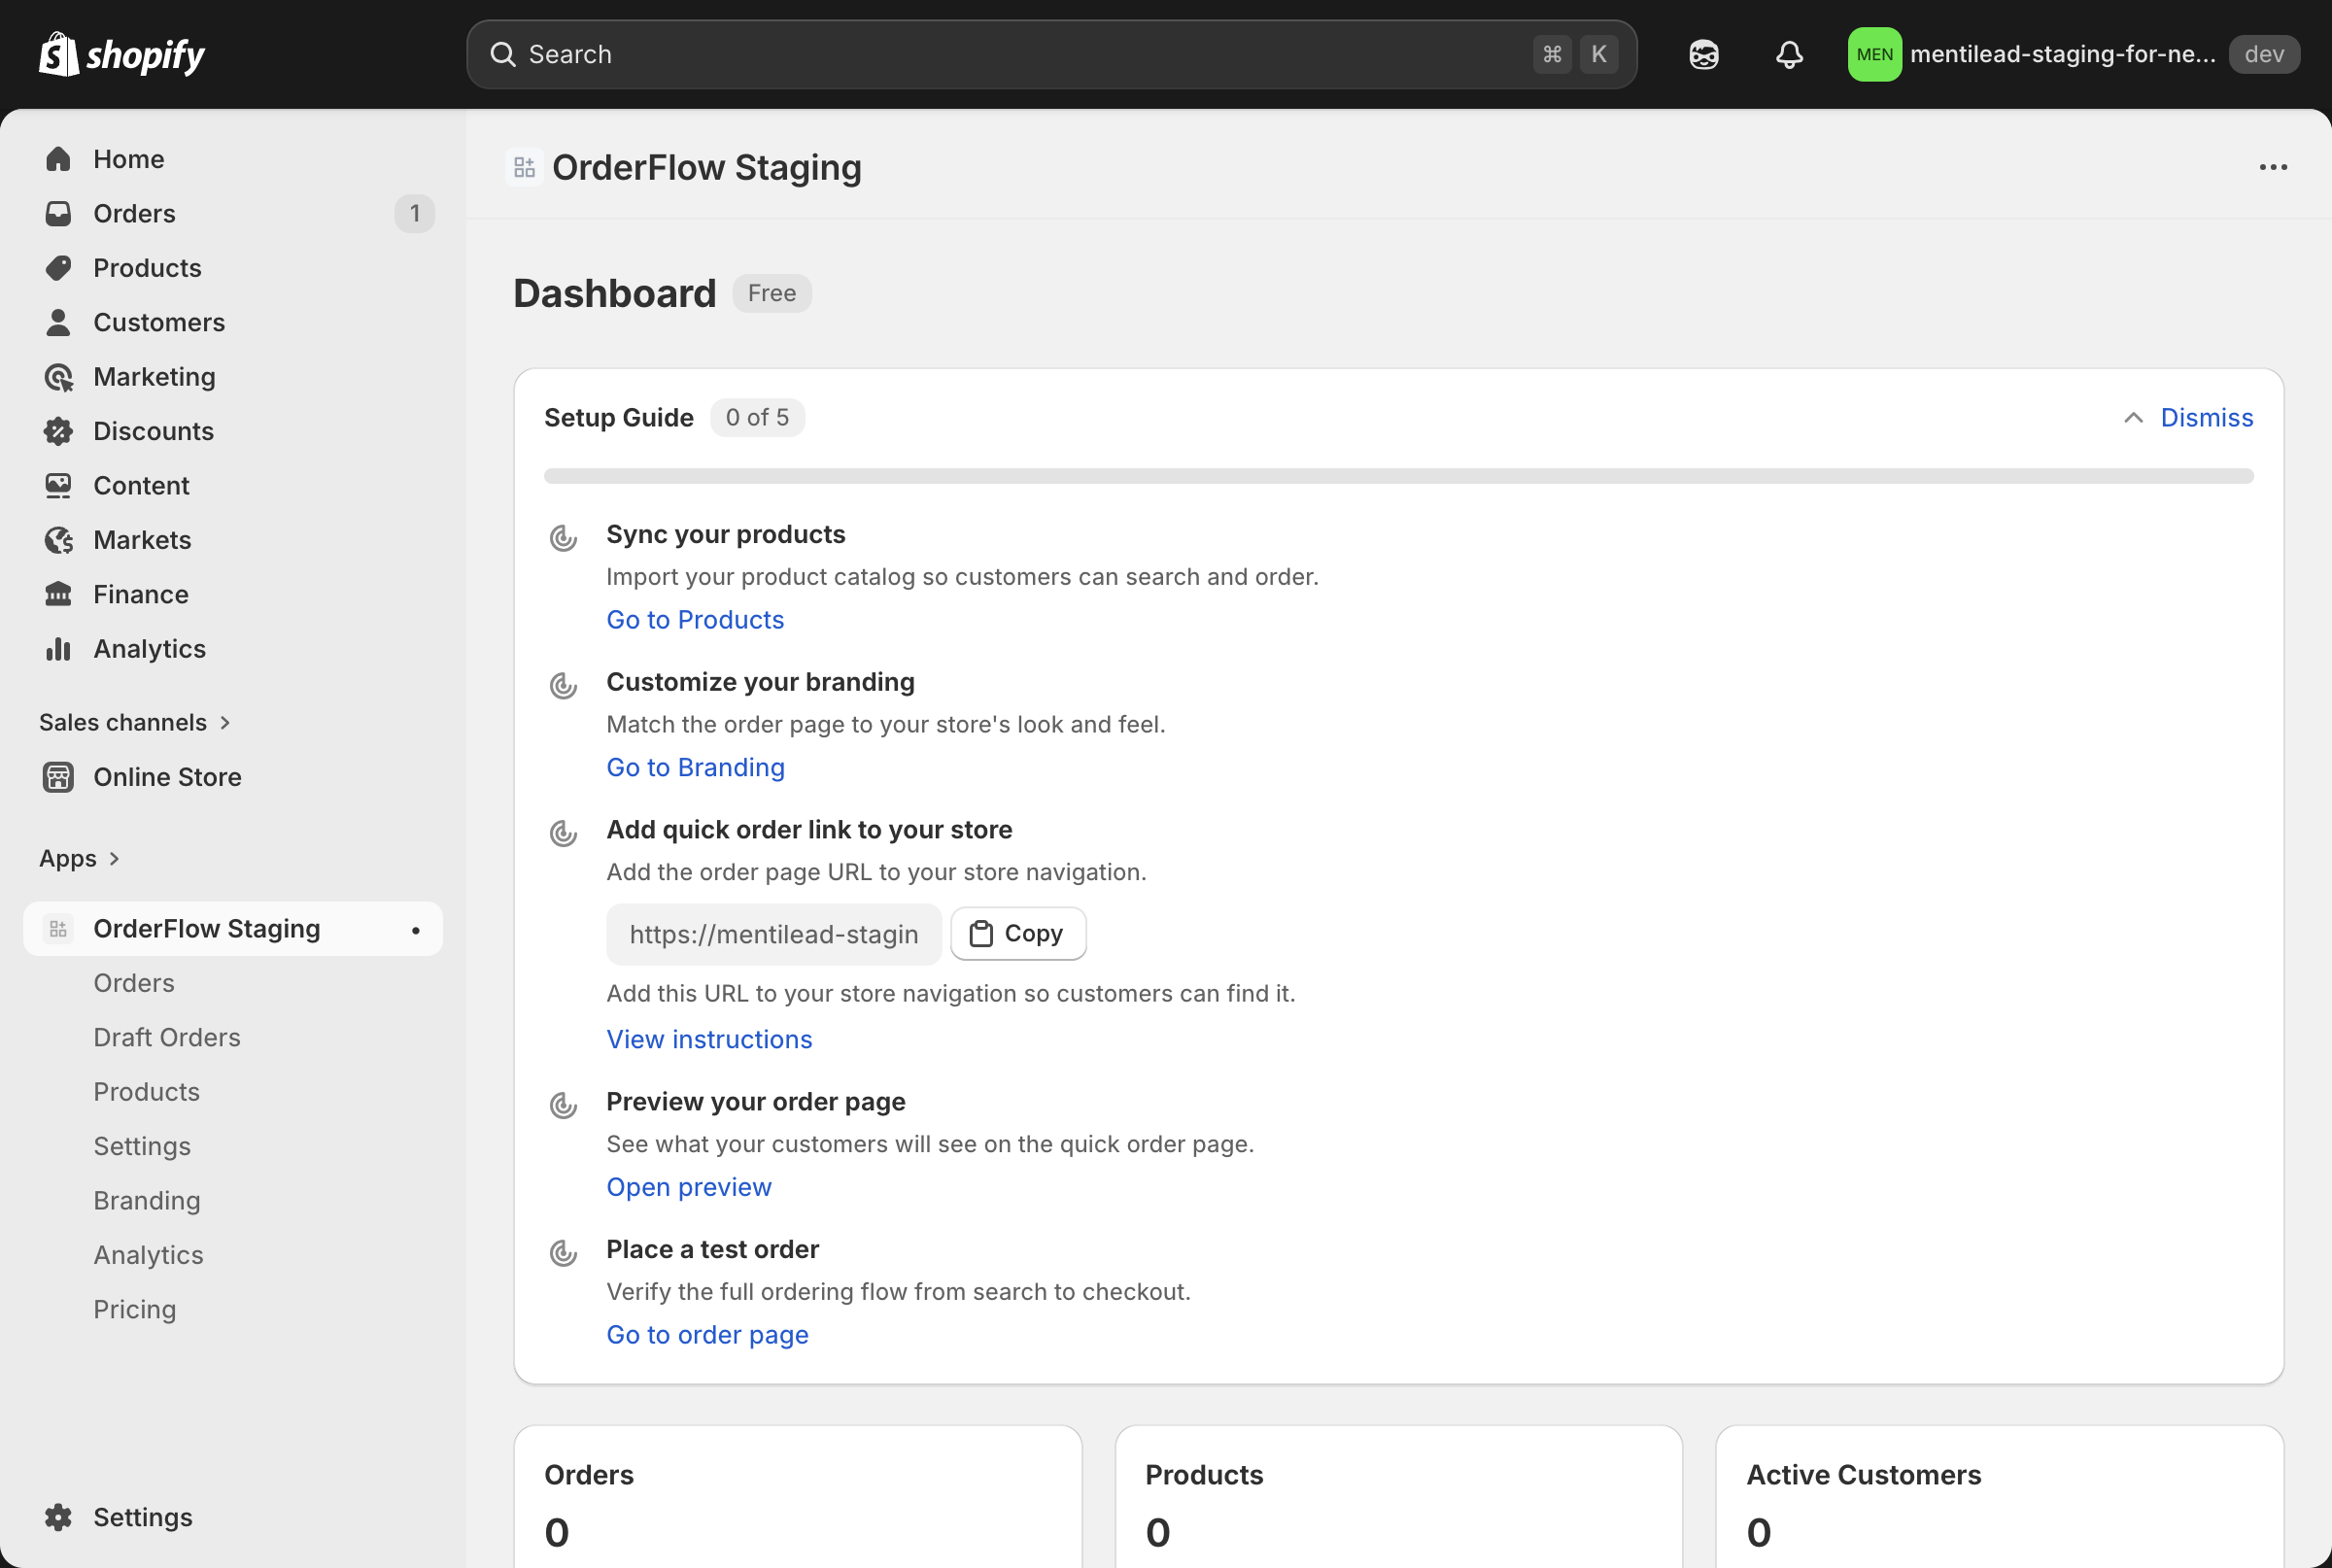
The admin dashboard gives you a complete overview of your quick order activity: orders placed, revenue generated, active buyers, and a guided setup checklist to get you up and running fast. A monthly order summary shows two figures side by side — total store orders and orders placed through OrderFlow — so you can see at a glance how much of your volume the quick-order page is driving.
2. Installation
Installing OrderFlow takes about a minute. The process is the same as any Shopify app — find it in the App Store, click Install, and authorize the permissions.
- Find OrderFlow in the Shopify App Store. Search for "OrderFlow" or "B2B quick order" in the Shopify App Store, or go straight to the direct App Store listing.
- Click Install and authorize the required permissions. OrderFlow requests access to your products, orders, and customers so it can display your catalog, process orders, and manage buyer eligibility. All permissions are the minimum required for the app to function.
- You'll be guided through a short setup wizard. On first install, OrderFlow opens a 2-step wizard: Try it as a buyer (paste a few SKUs and see your products resolve), then Make it reachable (add the quick order link to a store menu and check it). A finish screen then offers an optional Invite your first buyer. See section 8 below for a full walkthrough. Skip setup closes the wizard for good, and the Setup Guide on your dashboard carries the remaining steps.
Products sync automatically on first install — no manual action needed. OrderFlow fetches your entire product catalog in the background and caches it for fast search performance. The sync typically completes within a few minutes depending on your catalog size. After the initial sync, OrderFlow keeps your catalog up to date automatically — product changes you make in Shopify are picked up by a daily reconciliation, and you can trigger an immediate refresh anytime under Settings > Catalog & ordering rules > Product sync and ordering rules.
If you have a very large catalog (10,000+ products), the initial sync may take a bit longer. You can follow progress under Settings > Catalog & ordering rules > Product sync and ordering rules, which shows “Sync in progress” until it finishes. Once the sync is complete, your quick order page is ready to use.
3. Setup Guide
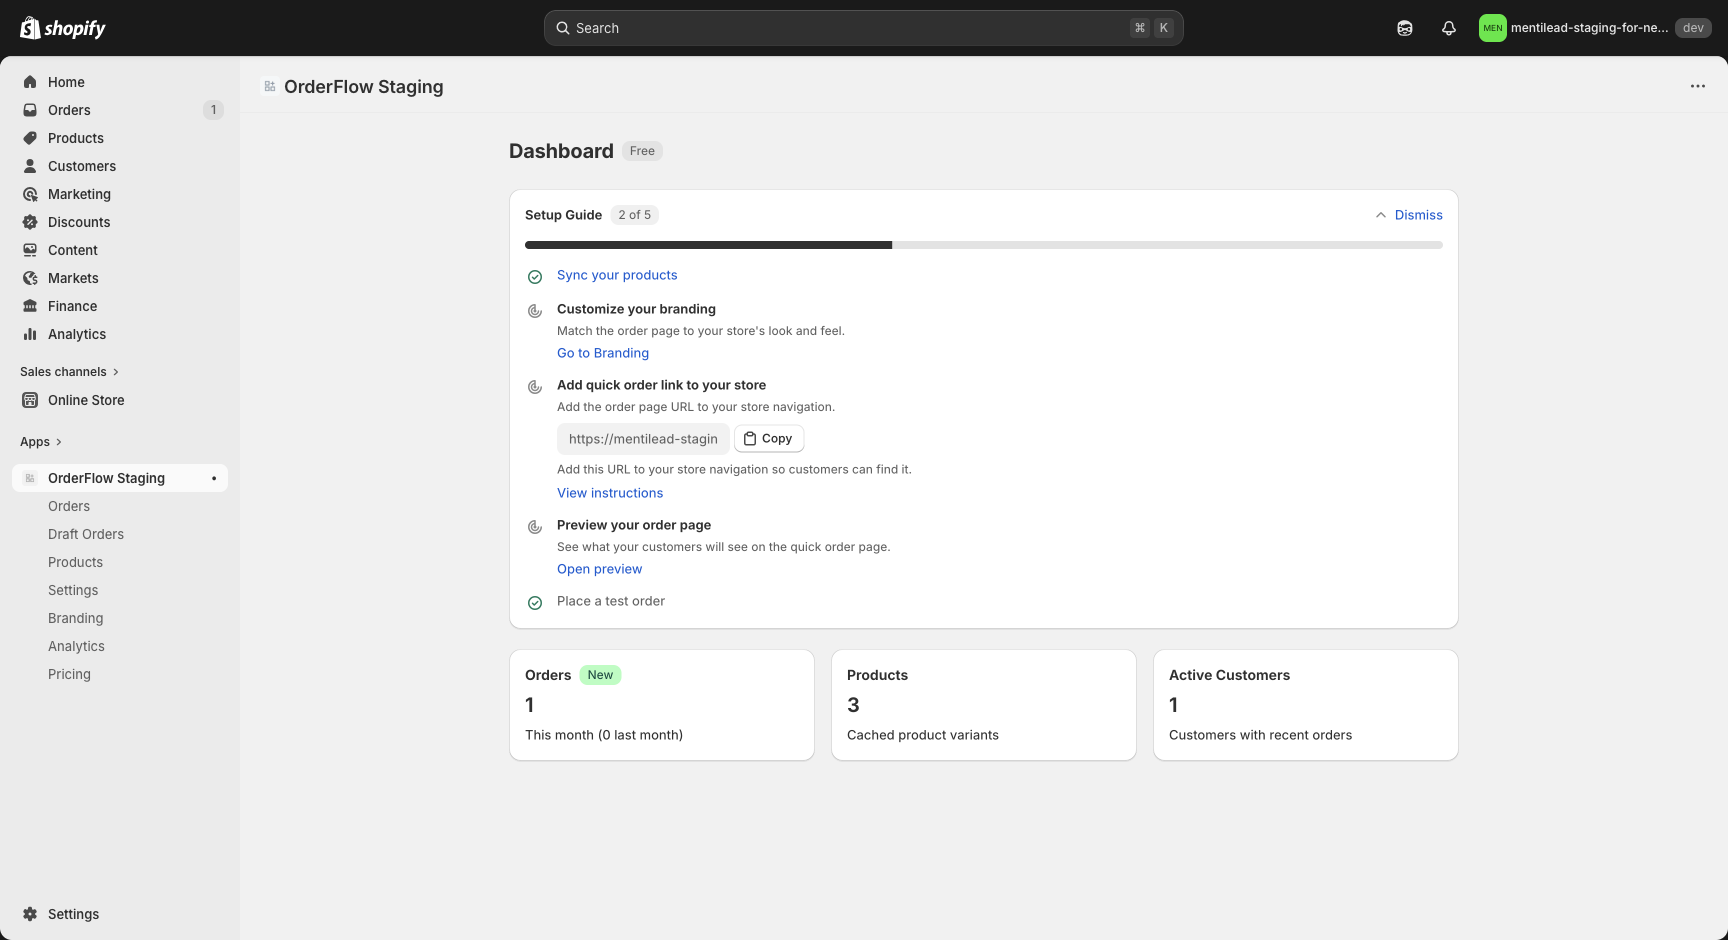
Your Dashboard includes a Setup Guide with a progress percentage. Every step ticks itself from what OrderFlow can see in your store, so nothing is ticked by just clicking a button.
Needs attention
When something needs fixing, a Needs attention card appears at the top of your Dashboard, with one fix per row. When everything is fine, the card doesn’t show.
- Your order page is offline — OrderFlow couldn’t connect the page to your store. Retry connection fixes it. If it keeps failing, contact support.
- Your order page is turned off — Buyers see “The order page is not currently available.” The row links to Order page settings, where you can turn it back on.
- Draft orders awaiting review — B2B orders waiting for your approval. Review draft orders opens them.
- Add a reply-to address for buyer emails — Without one, buyer replies to your order emails go to a no-reply address. Dismiss hides the suggestion. If you set a reply-to address and later clear it, the suggestion comes back.
Get your first order
- Try it as a buyer — Look up a few of your SKUs the way a buyer would.
- Add the order page link — Add the link to a storefront menu. It ticks once Check installation finds it, or when your first order comes in through the page.
- Invite your first buyer — Send a buyer the link, or choose Not for my store if your buyers already have the link.
- Get your first OrderFlow order — Ticks when a buyer places an order through your order page.
Set up your store
- Add SKUs — Only appears, at the top of this list, if your products have no SKUs. Buyers order by SKU, so add them in Shopify.
- Sync products — Happens automatically on install. While a large catalogue imports, the step shows “Syncing your catalogue…”.
- Customize branding — Match the order page to your store’s look and feel.
- Set your order notification email — Get an email for every new order, or choose Not for my store if you don’t want them.
Level up
Shown once the essentials are done: See one-click reorder (a sample order from your own products that never reaches Shopify), turn on reorder reminders, and set a B2B approval threshold on Shopify Plus stores with B2B companies.
Recommended for your store
If your store uses Shopify B2B and your plan doesn’t include wholesale pricing for B2B buyers, the guide suggests it with a See plans link. Recommendations never count toward your progress, and Not for my store removes them.
Each open step has Not now (hides the step for 7 days) and Remind me next login (hides it for 1 day). Optional steps also have Not for my store, which removes them for good. The × in the corner hides the guide until your next visit. New steps appear automatically when OrderFlow adds them.
When everything is done you see “You’re all set” once, and the guide then stays out of the way.
4. Adding the Link to Your Store
Your quick order page needs a link in your store's navigation so customers can find it. This is a standard Shopify menu item — no code required.
- Go to Content > Menus in your Shopify admin and pick your main menu.
- Click Add menu item.
- Set the title to "Quick Order" (or "Wholesale Order", "B2B Portal", "Bulk Order" — whatever fits your brand).
- Paste the proxy URL from Settings > Order page settings > Store Integration in the OrderFlow admin. The URL looks like
your-store.myshopify.com/apps/orderflow. - Click Save.
Then click Check installation on the dashboard Setup Guide (or in the setup wizard). The first time, OrderFlow may ask for optional permission to read your store navigation. It only reads your menus and never changes them, and you can decline. If you decline, the check still works on stores without a storefront password.
The link appears in your store navigation immediately. Customers can click it to access the quick order page directly from your storefront header.
Tip: You can also add the link to your footer navigation for additional visibility. Some merchants create a dedicated landing page explaining the benefits of their B2B ordering portal, then link to the quick order page from there. This works particularly well if you want to present the ordering experience with context about minimum order quantities, wholesale pricing, or account requirements.
If you use buyer eligibility restrictions (customer tags or B2B-only access), consider placing the link where only your target audience will see it — for example, in a separate "Wholesale" navigation menu that appears only for tagged customers via your theme's customer segmentation features.
Or show the order page inside one of your pages (optional)
If you'd like buyers to order without leaving your theme's header, footer and navigation, add the OrderFlow quick order block to one of your pages. The block shows the same quick order page inside the page. OrderFlow never edits your theme files: you add the block in the theme editor, and you remove it the same way. It needs an Online Store 2.0 theme.
- Go to Online Store > Pages and create a page, for example "Quick order".
- Go to Online Store > Themes > Customize, open Pages and create a new page template (for example "quick-order"), so your other pages are not affected. Assign it to the page you just created.
- Click Add block (or Add section) > Apps > OrderFlow quick order, then Save.
- Add the page to your menu under Content > Menus like any other page.
The block has two settings. App proxy path must match your OrderFlow App proxy URL; leave it at /apps/orderflow unless you customised the proxy subpath in Shopify. Minimum height is the smallest height the block uses; it grows with the order page automatically.
Checkout, the company invoice and the login page always open over the whole page, not inside the block. Check installation looks for a menu link to the order page itself; if your menu only links to the page that holds the block, the Setup Guide step completes by itself after the first order placed through OrderFlow.
5. Your Quick Order Page
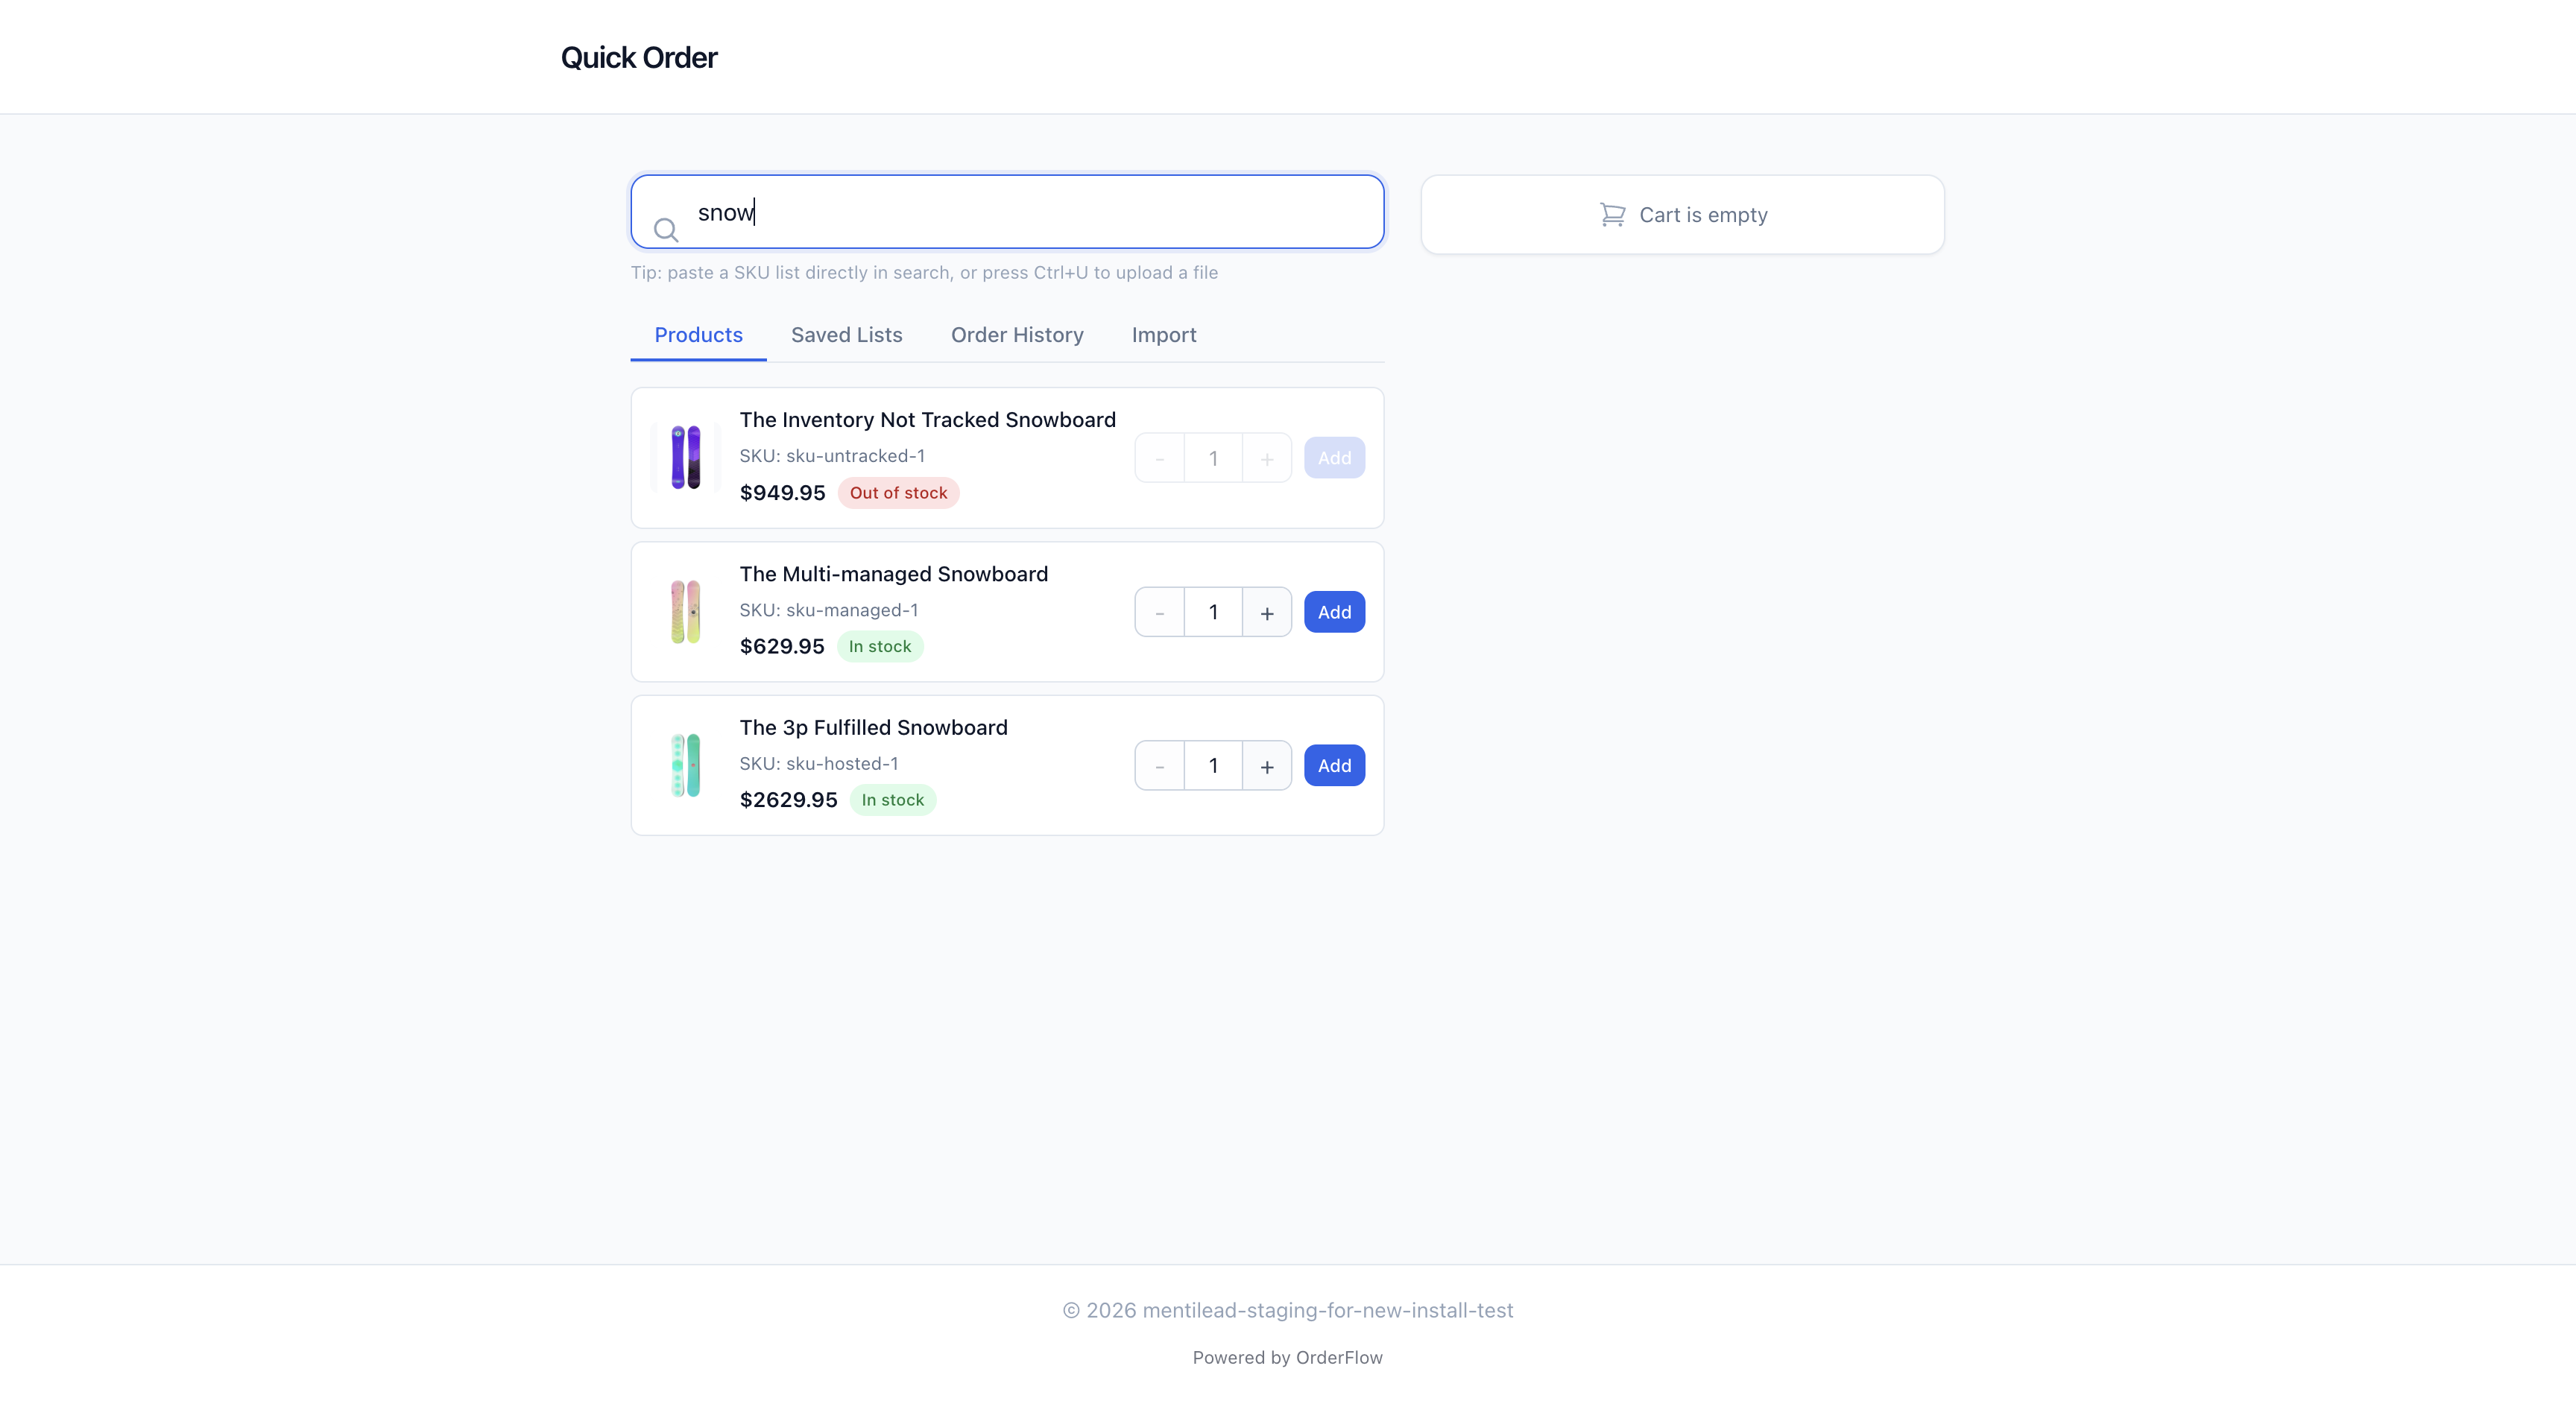
This is what your customers see — a full-featured ordering interface designed for speed and efficiency. Everything is on a single unified page with no tab-switching:
- Search — Always-visible search bar for SKU or product name lookup, with recent searches and keyboard shortcuts (press / to focus).
- Quick Entry — Paste a list of SKUs with quantities directly, or upload CSV/Excel files for bulk ordering via the import button.
- Frequently Ordered — Returning buyers see their most-ordered products for instant add-to-cart. First-time buyers see popular products and category tiles.
- Saved Lists — Save frequently ordered combinations for one-click reordering. Lists appear as horizontal cards you can scroll through.
- Order History — View all past orders (both OrderFlow and Shopify orders) with source badges. Hit "Reorder All" to reload a previous order into the cart.
The desktop layout uses a split-panel design: the left side for browsing and ordering, and a sticky cart sidebar on the right showing a running total with all added items, quantities, and line prices. Checkout creates a standard Shopify cart via the Storefront API and redirects to your native Shopify checkout — customers use their familiar checkout experience with all your payment methods and shipping options.
On mobile, the cart becomes a bottom sheet that slides up when tapped. All touch targets are sized for comfortable tapping, and the product cards stack vertically for easy scrolling.
6. Plans and Pricing
OrderFlow offers three plans to match your business needs. All billing is handled through Shopify — you'll see charges on your regular Shopify invoice.
Free
$0/month
- 10 orders placed through OrderFlow per month
- Orders 11 to 20 still go through, never charged
- SKU search and reorder
- CSV import (50 rows)
- "Powered by OrderFlow" badge
Standard
$9.99/month
14-day free trial
- Unlimited orders
- Saved lists
- Customer tag filtering
- Analytics dashboard
- Unlimited CSV import
- No badge
- Branded buyer emails
- B2B market pricing
- B2B company support (approval, draft orders)
Plus
$19.99/month
14-day free trial
- Everything in Standard
- MOQ per-collection rules
- Priority support
The Free plan is a great way to test OrderFlow with real customers before committing. When you're ready to remove the badge, unlock saved lists, and get analytics, upgrade to Standard. The Standard plan includes B2B market-based catalog pricing for any Shopify plan using Shopify Markets with catalog price lists. Company-based B2B (approval workflows, payment terms, and draft orders) is included on Standard and requires a Shopify Plus store. The Plus plan adds per-collection MOQ rules and priority support.
Changing or cancelling your plan
You change plans on the app's Pricing page. When you cancel or move to a lower plan there, OrderFlow asks you to pick a reason and lets you add an optional comment of up to 500 characters. Uninstalling OrderFlow or cancelling through Shopify's own screens ends the subscription without asking for a reason.
7. What's Next
Now that your quick order page is live, explore the rest of OrderFlow's features to get the most out of your B2B ordering experience.
- Customize branding — Choose from 6 presets or fine-tune colors, fonts, and styles to match your brand identity.
- Configure settings — Set up buyer eligibility, email notifications, and integrations.
- Set up email notifications — Customize order confirmation, merchant alerts, and reorder reminder templates.
- Connect Shopify Flow — Automate workflows with OrderFlow's built-in Flow triggers for orders, reorders, CSV imports, and usage limits.
- View analytics — Track order volume, revenue trends, top products, and buyer activity on the analytics dashboard.
If you have questions or run into issues, reach out to us at hello@mentilead.com. We typically respond within a few hours during European business hours.
For a deep dive into what your customers see on the storefront, check out the Quick Order Page guide — it covers every tab, feature, and interaction in detail.
Orders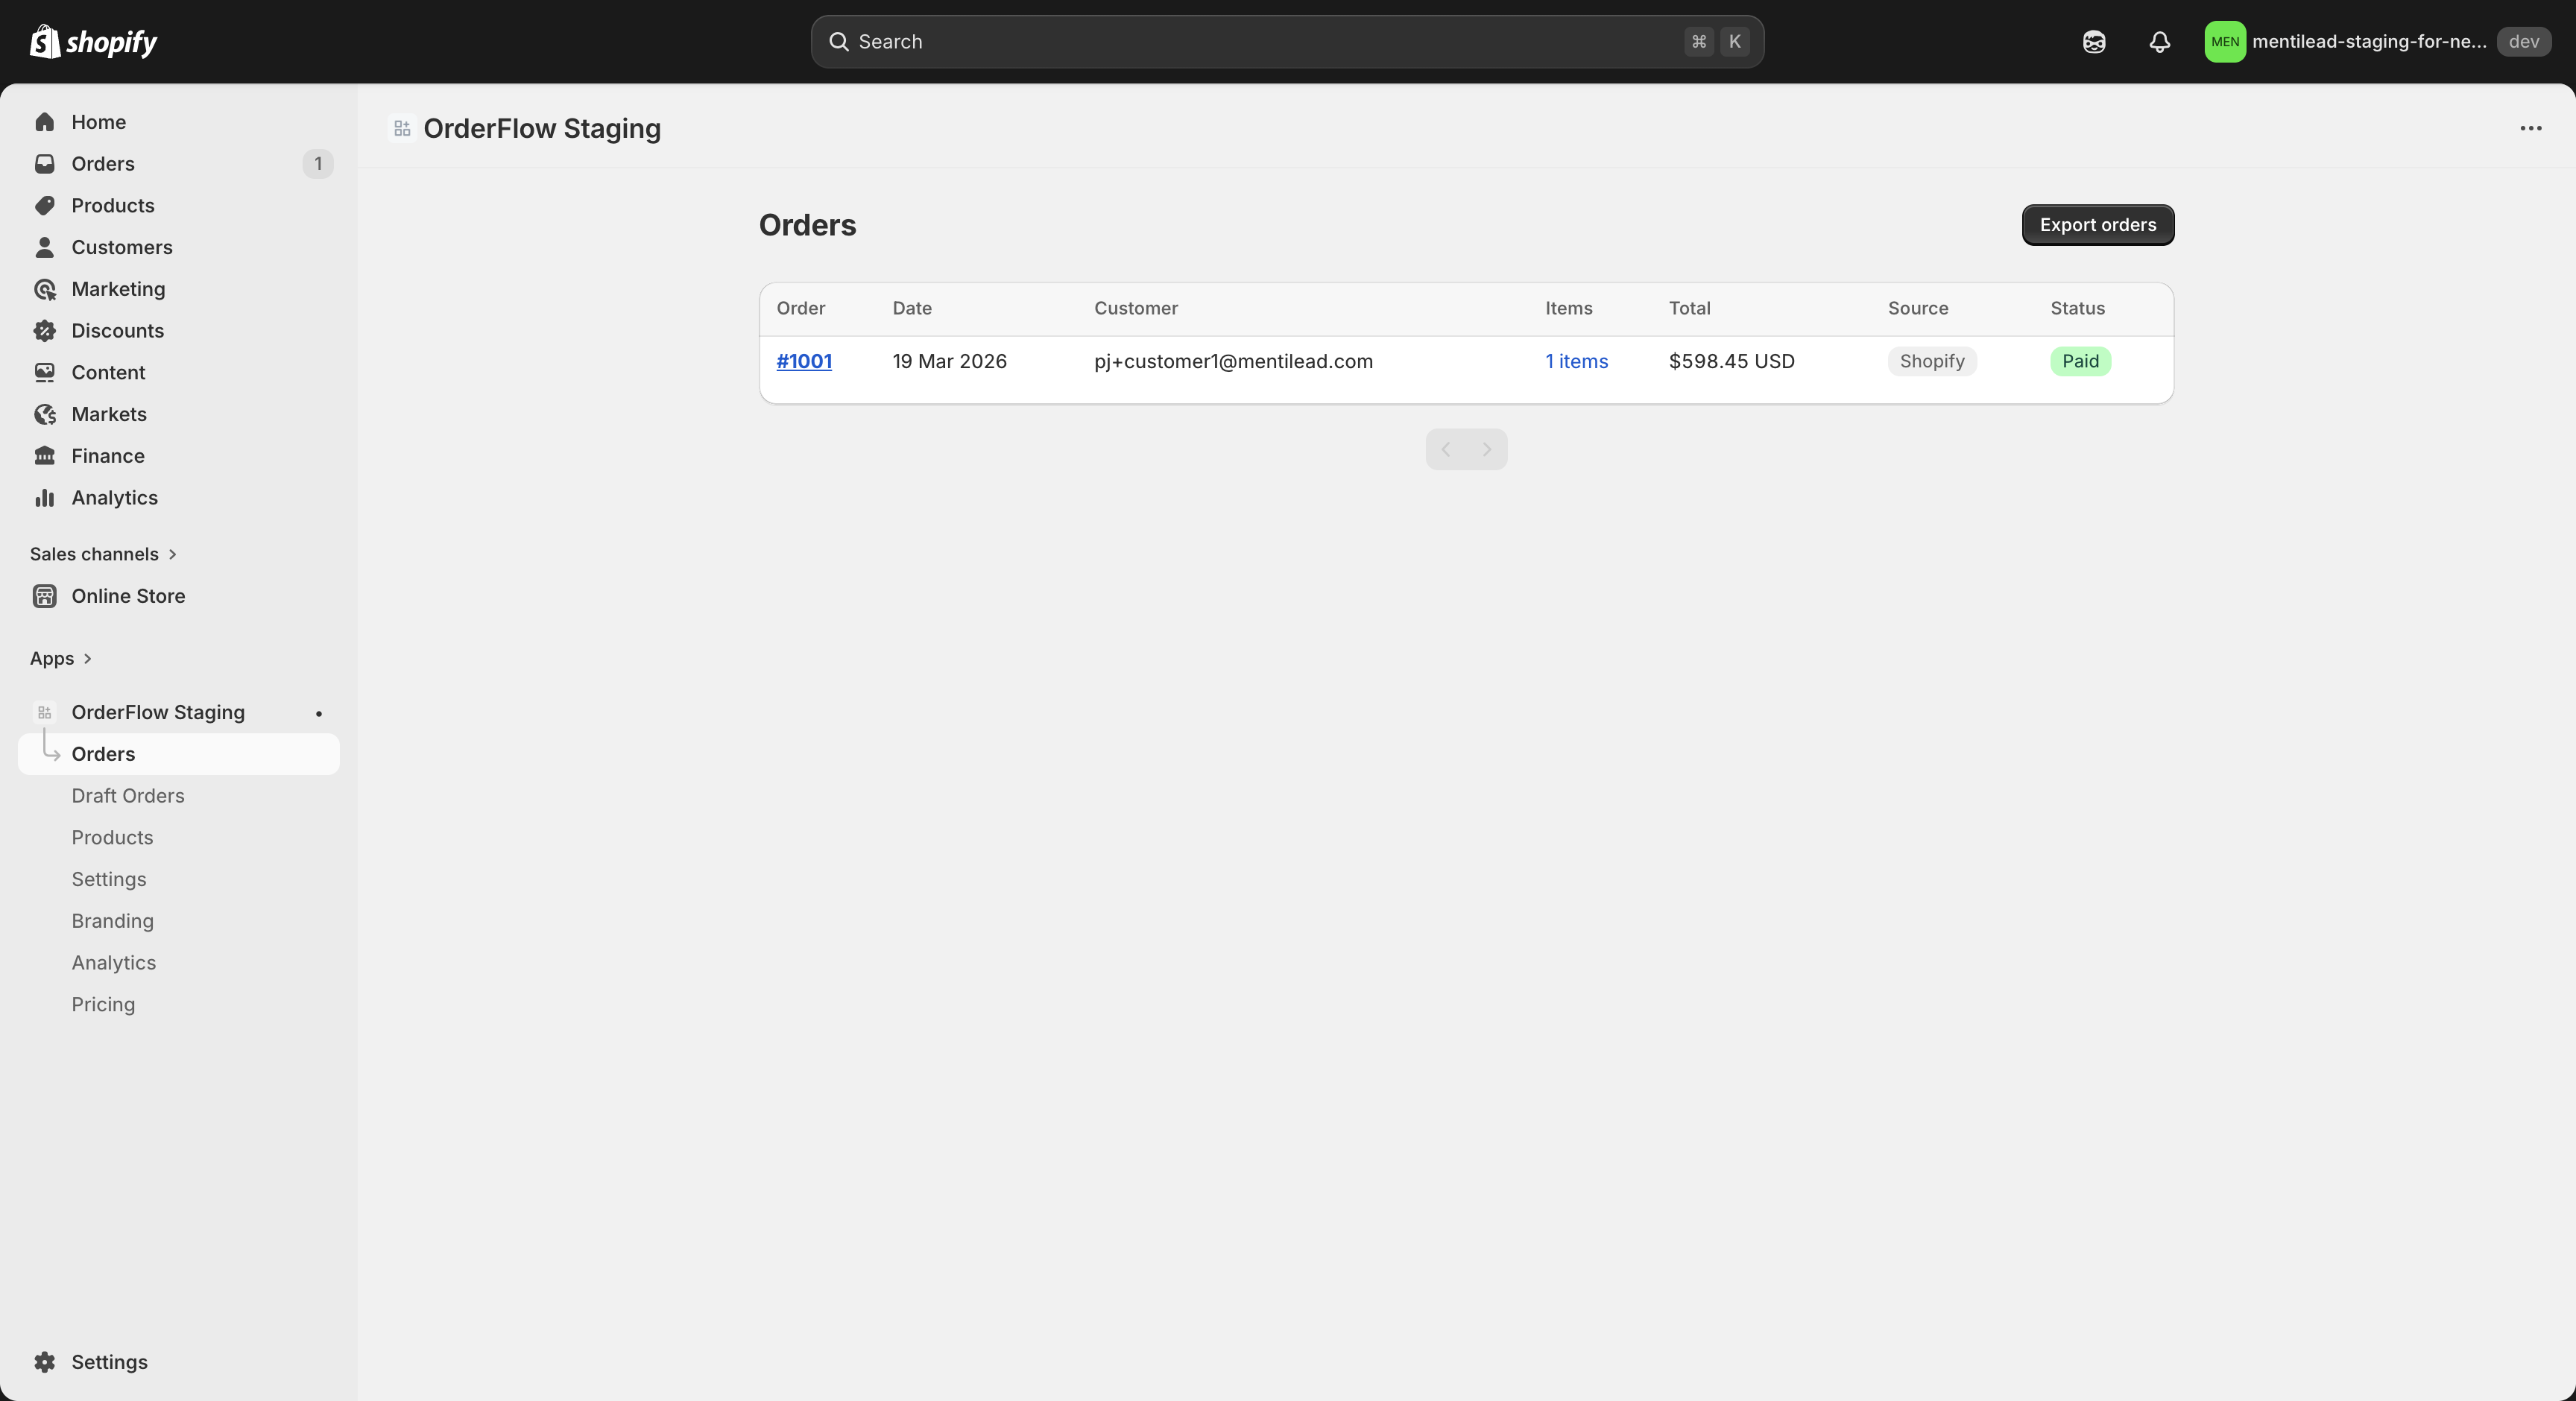
8. New Install Wizard
When you first install OrderFlow, a short setup wizard (the "New install wizard") gets your quick order page live before your dashboard opens. It has two steps and takes less than two minutes: see the page work with your own products, then make it reachable from your storefront.

Steps in the wizard
Every store sees the same 2 steps, on Shopify Plus too (there is no company screen):
- Try it as a buyer — paste a few SKUs (we pre-fill three of your products (your best sellers once you have sales history)) and see them resolve to your products, list prices and stock, right inside Shopify admin. Nothing is added to a cart or sent to Shopify. If your products have no SKUs yet, the card uses product titles and shows how to add SKUs. The Try-it card always shows list prices, with a note that B2B buyers signed in to a company see their catalog prices.
- Make it reachable — copy your buyer link or download its QR code, then add the link to a store menu (Shopify admin › Content › Menus) and click Check installation. Once the link is found, the wizard moves on by itself. Do this later moves on without it.
The wizard then ends on a finish screen that tells you whether your order page is live. From there you can Invite your first buyer (see section 9) or go straight to your dashboard. If you close the app halfway, the wizard picks up where you left off.
The card's Open the real page in a new tab button still opens your storefront order page. While your storefront password is on, that page shows your password page instead.
Skip setup on either step closes the wizard for good — it will not open again. Whether you finish or skip it, the Setup Guide on your Dashboard carries any remaining steps as your ongoing activation checklist.
9. Your first buyer
The install wizard's finish screen offers Invite your first buyer, and if that buyer hasn't ordered after 14 days, the dashboard's Invite someone else reopens it. Enter one buyer's name and email and we'll send them an invitation written for your store, from your email address, with a link to your new quick order page. The message is pre-filled for your store (B2B wording when Shopify B2B is detected), so it reads like it came from you, not from an app. You can also skip this if you'd rather send invites yourself later — but walking one real buyer through the flow is the fastest way to confirm that pricing, shipping, and checkout all look right on a live browser session.
After you send the invitation, your dashboard replaces the Setup Guide with an "Awaiting first order" card that names your buyer and shows a 4-step checklist: email sent, link opened, products added to cart, first order placed. The card is the primary focus of the dashboard for the next two weeks — until the first order lands or the window closes — so you always know whether the invite turned into a real order, and where in the flow the buyer is.
When that first order does come in, a celebration modal fires once on the dashboard with two quick actions: jump to the order detail in Shopify admin, or share a pre-written LinkedIn post about your store's new self-serve wholesale flow. It's a small moment, but it marks the transition from setup to real revenue — and it only fires once, so reload or come back later and the dashboard returns to its normal metrics view.